How to add SVG Backgrounds in Webflow
By Matt Visiwig  Jan 21, 2022
There are two methods to add SVG Backgrounds within the webflow editor.
- Uploading an SVG file
- Adding custom CSS
We’ll cover both methods, but please note the second method requires a paid version of Webflow.
How to upload and use an SVG background into Webflow
First we need an SVG file to upload to Webflow. For this tutorial, I grabbed a free design from SVGBackgrounds.com by selecting a background and clicking EXPORT > SVG (download).
Watch the video for the entire process, or skip to the next step part of the written tutorial.
Once you have a file with the .svg file extension, you can import or drag it right into the assets library in Webflow. To open the assets panel, press J or find the photographs icon on the very left edge menu. It also automatically opens when you click “Choose image” under the Backgrounds menu, which is where we’re headed next.
Now to apply a SVG as the background, we need to select the desired element. You can choose a specific section, container, or even the entire <body> element. Once selected you can find the background options within the Style panel (press S), this is where you need to click the + icon next to the “Image & gradient” label.
This adds a dummy background image within your selected element, but to add our SVG Background you need to click “Choose image” and then select your uploaded SVG image from the assets panel.
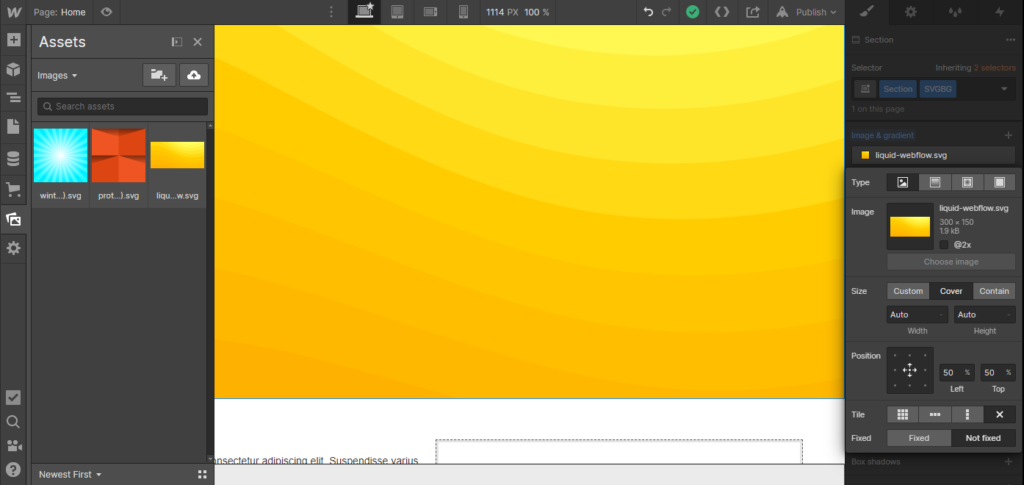
You should see you SVG displaying as the background, but you may need to play with a few options to get it looking perfect.
For most backgrounds, choosing Cover for the size will help stretch the background to fill the entire container and clicking the middle on Position grid will center the background. The Fixed and Not fixed options changes how the image displays while you scroll. Lastly, notice that backgrounds tile by default, this shouldn’t be a problem in most cases, but sometimes you don’t want the background to repeat like a pattern, so you can click the X to disable tiling.
That’s it takes to use SVG backgrounds in Webflow, but you can get more advanced with CSS in the other method to add SVG backgrounds.
How to add an SVG background via CSS in Webflow
Note: This method requires a paid site plan or account plan of Webflow. You cannot add custom CSS to a free version of Webflow.
There are three places to add custom CSS in Webflow
- Project settings
Access Project Settings by the top-left hamburger menu and click the Custom Code tab to find theHead Codefield. - Page Settings
Access the Page Settings by clicking the cog icon of a selected page and scroll down to the Custom code section to find theInside <head> tag. - HTML Embed widget
Click the add element button (very top left) and scroll down to find theEmbedwidget under the components section.
In all three cases, we’ll be adding an SVG Background by creating a class we can reference elsewhere on the page.
Creating a reusable class in Webflow
Once you found the field to place custom code in the previous step, we need to wrap what we write in <style> tags to tell Webflow and the browser that this is CSS. You can create multiple classes between the opening and closing <style> tags.
<style>
   /* YOUR CSS CODE WILL GO HERE */
</style>
Next we need to create a class, so we can reuse the background anywhere on the webpage. Within the <style> tags we call the class class-name, placing a . (period) at the start of the class name. A class name needs to start with a letter and can consist of letters, numbers, hyphens (-), and underscores (_). Finally, all the CSS rules will live between braces { }.
<style>
   .class-name{
      /* YOUR BACKGORUND HERE */
   }
</style>
Now we’ll visit SVGBackgrounds.com/free and grab CSS code from our chosen background. After you find and customize a background, click the EXPORT button and then the CSS button to add the CSS code right to your clipboard. You can see where to paste it within the class we created, in the above code example. Here is what I ended up with:
<style>
   .class-name{
      background-color: #ffaa00;
      background-image: url("data:image/svg+xml,%3Csvg xmlns='http://www.w3.org/2000/svg' width='100%25' height='100%25' viewBox='0 0 1600 800'%3E%3Cg %3E%3Cpath fill='%23ffb100' d='M486 705.8c-109.3-21.8-223.4-32.2-335.3-19.4C99.5 692.1 49 703 0 719.8V800h843.8c-115.9-33.2-230.8-68.1-347.6-92.2C492.8 707.1 489.4 706.5 486 705.8z'/%3E%3Cpath fill='%23ffb800' d='M1600 0H0v719.8c49-16.8 99.5-27.8 150.7-33.5c111.9-12.7 226-2.4 335.3 19.4c3.4 0.7 6.8 1.4 10.2 2c116.8 24 231.7 59 347.6 92.2H1600V0z'/%3E%3Cpath fill='%23ffbe00' d='M478.4 581c3.2 0.8 6.4 1.7 9.5 2.5c196.2 52.5 388.7 133.5 593.5 176.6c174.2 36.6 349.5 29.2 518.6-10.2V0H0v574.9c52.3-17.6 106.5-27.7 161.1-30.9C268.4 537.4 375.7 554.2 478.4 581z'/%3E%3Cpath fill='%23ffc500' d='M0 0v429.4c55.6-18.4 113.5-27.3 171.4-27.7c102.8-0.8 203.2 22.7 299.3 54.5c3 1 5.9 2 8.9 3c183.6 62 365.7 146.1 562.4 192.1c186.7 43.7 376.3 34.4 557.9-12.6V0H0z'/%3E%3Cpath fill='%23ffcc00' d='M181.8 259.4c98.2 6 191.9 35.2 281.3 72.1c2.8 1.1 5.5 2.3 8.3 3.4c171 71.6 342.7 158.5 531.3 207.7c198.8 51.8 403.4 40.8 597.3-14.8V0H0v283.2C59 263.6 120.6 255.7 181.8 259.4z'/%3E%3Cpath fill='%23ffd914' d='M1600 0H0v136.3c62.3-20.9 127.7-27.5 192.2-19.2c93.6 12.1 180.5 47.7 263.3 89.6c2.6 1.3 5.1 2.6 7.7 3.9c158.4 81.1 319.7 170.9 500.3 223.2c210.5 61 430.8 49 636.6-16.6V0z'/%3E%3Cpath fill='%23ffe529' d='M454.9 86.3C600.7 177 751.6 269.3 924.1 325c208.6 67.4 431.3 60.8 637.9-5.3c12.8-4.1 25.4-8.4 38.1-12.9V0H288.1c56 21.3 108.7 50.6 159.7 82C450.2 83.4 452.5 84.9 454.9 86.3z'/%3E%3Cpath fill='%23ffef3d' d='M1600 0H498c118.1 85.8 243.5 164.5 386.8 216.2c191.8 69.2 400 74.7 595 21.1c40.8-11.2 81.1-25.2 120.3-41.7V0z'/%3E%3Cpath fill='%23fff852' d='M1397.5 154.8c47.2-10.6 93.6-25.3 138.6-43.8c21.7-8.9 43-18.8 63.9-29.5V0H643.4c62.9 41.7 129.7 78.2 202.1 107.4C1020.4 178.1 1214.2 196.1 1397.5 154.8z'/%3E%3Cpath fill='%23ffff66' d='M1315.3 72.4c75.3-12.6 148.9-37.1 216.8-72.4h-723C966.8 71 1144.7 101 1315.3 72.4z'/%3E%3C/g%3E%3C/svg%3E");
      background-attachment: fixed;
      background-size: cover;
      /* ADD EXTRA CSS HERE */
   }
</style>
The class is now created. If we associate this class with any section or container in Webflow, we will see the background!
Now we can easily associate this class (class-name) we created by selecting the desired container and typing the class name into the selector field in the style panel. Once associated, the SVG Background should display.
There you have it, two different methods for adding SVG Backgrounds using Webflow.
Hey, I'm Matt , the creator behind SVG Backgrounds. I produce free and paid resources every month, sign up for alerts.